- 4주차(9.17) : AWS WA Labs : Security2023년 08월 25일
- 59lee
- 작성자
- 2023.08.25.:31
AWS Well-Architected - 안전하고 효율적인 클라우드 애플리케이션 구축 (amazon.com)
AWS Well-Architected - 안전하고 효율적인 클라우드 애플리케이션 구축
AWS Well-Architected Lenses는 AWS Well-Architected에서 제공하는 지침을 기계 학습(ML), 데이터 분석, 서버리스, 고성능 컴퓨팅(HPC), IoT, SAP, 스트리밍 미디어, 게임 산업, 하이브리드 네트워킹 및 금융 서비스
aws.amazon.com
설계 원칙 - AWS Well-Architected Framework (amazon.com)
설계 원칙 - AWS Well-Architected Framework
이 페이지에 작업이 필요하다는 점을 알려 주셔서 감사합니다. 실망시켜 드려 죄송합니다. 잠깐 시간을 내어 설명서를 향상시킬 수 있는 방법에 대해 말씀해 주십시오.
docs.aws.amazon.com
정의 - AWS Well-Architected Framework (amazon.com)
정의 - AWS Well-Architected Framework
이 페이지에 작업이 필요하다는 점을 알려 주셔서 감사합니다. 실망시켜 드려 죄송합니다. 잠깐 시간을 내어 설명서를 향상시킬 수 있는 방법에 대해 말씀해 주십시오.
docs.aws.amazon.com
SEC01-BP01 Separate workloads using accounts - Security Pillar (amazon.com)
SEC01-BP01 Separate workloads using accounts - Security Pillar
SEC01-BP01 Separate workloads using accounts Establish common guardrails and isolation between environments (such as production, development, and test) and workloads through a multi-account strategy. Account-level separation is strongly recommended, as it
docs.aws.amazon.com
SEC01-BP02 Secure account root user and properties - Security Pillar (amazon.com)
SEC01-BP02 Secure account root user and properties - Security Pillar
SEC01-BP02 Secure account root user and properties The root user is the most privileged user in an AWS account, with full administrative access to all resources within the account, and in some cases cannot be constrained by security policies. Deactivating
docs.aws.amazon.com
AWS Well-Architected Labs :: AWS Well-Architected Labs (wellarchitectedlabs.com)
AWS Well-Architected Labs :: AWS Well-Architected Labs
Introduction The Well-Architected framework has been developed to help cloud architects build the most secure, high-performing, resilient, and efficient infrastructure possible for their applications. This framework provides a consistent approach for custo
wellarchitectedlabs.com
[실습] AWS Account Setup and Root User : 자격증명 보고서 , 암호 설정 정책

자격증명 보고서 **user,arn,user_creation_time,password_enabled,password_last_used,password_last_changed,password_next_rotation,mfa_active,access_key_1_active,access_key_1_last_rotated,access_key_1_last_used_date,access_key_1_last_used_region,access_key_1_last_used_service,access_key_2_active,access_key_2_last_rotated,access_key_2_last_used_date,access_key_2_last_used_region,access_key_2_last_used_service,cert_1_active,cert_1_last_rotated,cert_2_active,cert_2_last_rotated** **admin**,arn:aws:iam::911283464785:user/admin,2021-02-01T14:54:46+00:00,true,2023-09-16T06:05:41+00:00,2022-03-20T19:43:08+00:00,N/A,true,true,2023-03-23T03:32:07+00:00,2023-09-16T03:02:00+00:00,ap-northeast-2,sts,false,N/A,N/A,N/A,N/A,false,N/A,false,N/A ...Configure a Strong Password Policy for Your Users : 암호 설정 정책 사용

암호 설정 정책 사용(1단계) 
암호 설정 정책 사용(2단계) [실습] CloudFront with S3 Bucket Origin : 접근 제한된 버킷을 CloudFront를 통해서 접속
Amazon CloudFront 오리진 액세스 제어(OAC)로 S3 오리진 보호하기 | Amazon Web Services
Amazon CloudFront 오리진 액세스 제어(OAC)로 S3 오리진 보호하기 | Amazon Web Services
Amazon CloudFront는 애플리케이션, 웹 사이트, 비디오, API를 전 세계 시청자에게 밀리초 단위로 안전하게 제공하는 글로벌 콘텐츠 전송 네트워크입니다. CloudFront를 사용하면 고객은 다양한 유형의
aws.amazon.com
Amazon S3 오리진에 대한 액세스 제한 - Amazon CloudFront
Amazon S3 오리진에 대한 액세스 제한 - Amazon CloudFront
CloudFront가 지원하는 모든 HTTP 메서드를 수락하고 전달하도록 CloudFront를 구성하는 경우 CloudFront OAI에 원하는 권한을 부여해야 합니다. 예를 들어 DELETE 메서드를 사용하는 요청을 수락하고 전달하
docs.aws.amazon.com

s3 버킷 설정 <!DOCTYPE html> <html> <head> <title>Example</title> </head> <body> <h1>CloudNet@ - Example Heading</h1> <p>CloudNet@ - Example paragraph.</p> </body> </html>
html 파일 생성 
업로드 준비 
퍼플릭 엑세스 차단 상태 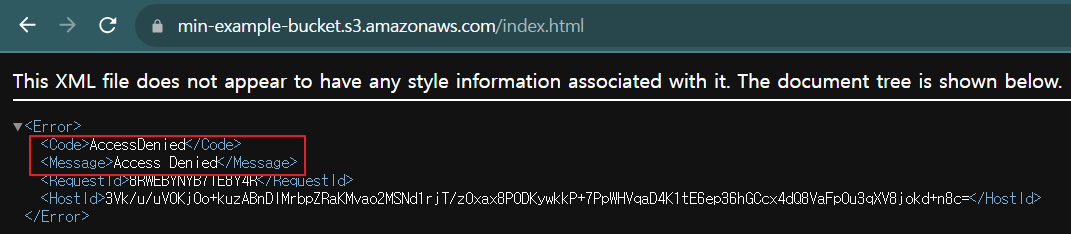
객체에 대한 접근이 당연히 안 된다. 
Cloudfront 설정(1단계) 
Cloudfront 설정(2단계) 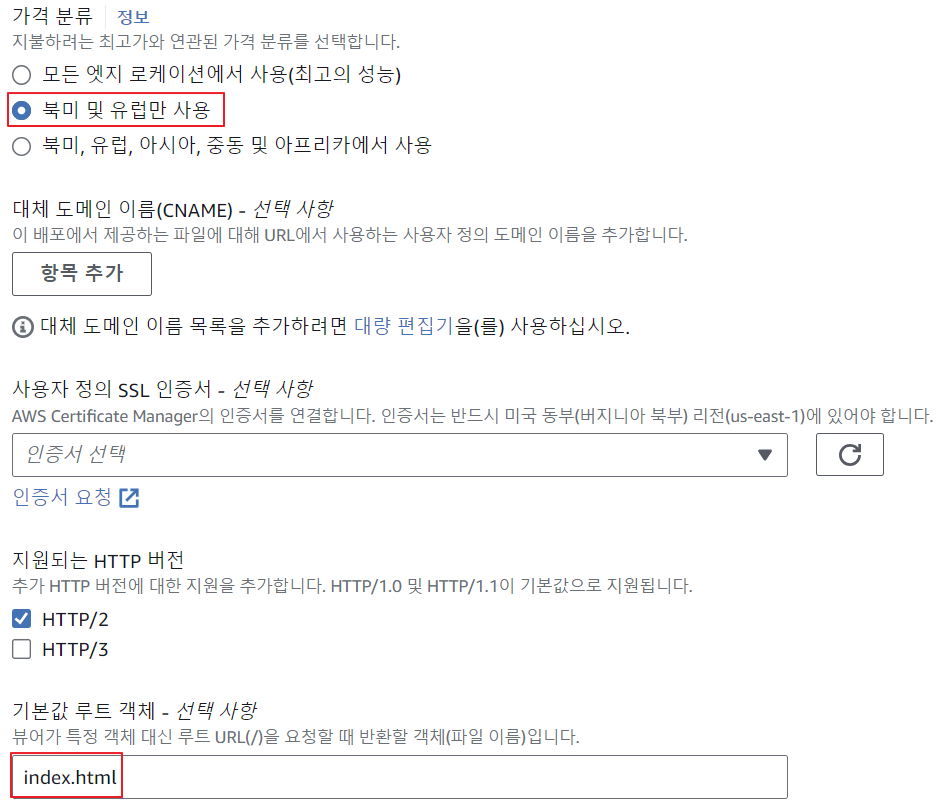
Cloudfront 설정(3단계) 
S3 버킷 정책(Cloudfront 설정) 
Cloudfront 도메인으로 접근 
S3 버킷에 있는 파일이 잘 나옴 https://wellarchitectedlabs.com/security/200_labs/200_automated_iam_user_cleanup/
Level 200: Automated IAM User Cleanup :: AWS Well-Architected Labs
Level 200: Automated IAM User Cleanup Authors Pierre Liddle, Principal Security ArchitectByron Pogson, Solutions Architect Introduction This hands-on lab will guide you through the steps to deploy a AWS Lambda function with AWS Serverless Application Model
wellarchitectedlabs.com
# 파일 다운로드
**wget <https://wellarchitectedlabs.com/Security/200_Automated_IAM_User_Cleanup/Code/cloudformation-iam-user-cleanup.yaml>
wget <https://wellarchitectedlabs.com/Security/200_Automated_IAM_User_Cleanup/Code/lambda-iam-user-cleanup.py**>

# S3 버킷 생성
#aws s3 mb s3://***버킷***(유일한 이름) --region ap-northeast-2
NICKNAME=<각자 자신의 유일한 닉네임>
NICKNAME=gasida
**aws s3 mb s3://$NICKNAME-ahss-4w --region ap-northeast-2**
aws s3 ls

# Run the following command to prepare your deployment package
**aws cloudformation package --template-file cloudformation-iam-user-cleanup.yaml --output-template-file output-template.yaml --s3-bucket $NICKNAME-ahss-4w**
aws s3 ls s3://$NICKNAME-ahss-4w --human-readable

# Once you have finished preparing the package you can deploy the CloudFormation with AWS SAM:
MYEMAIL='<각자 자신의 이메일>'
MYEMAIL='gasida.seo@gmail.com'
**aws cloudformation deploy --template-file output-template.yaml --stack-name IAM-User-Cleanup --capabilities CAPABILITY_IAM --parameter-overrides NotificationEmail=$MYEMAIL**
Cloudshell에서 관련된 파일 다운로드 
닉네임 입력 
S3 버킷 설정 
배포 패키지 설정 
이메일 설정 및 배포 성공 
빨간 박스에 누르면 안내문 나옴 
성공적으로 구독이 되었다고 나옴 
파라미터 잘 되었다고 선정됨 
Lambda:Function에 링크 클릭 
테스트 
이벤트 브리지 규칙 확인 
크론식 확인 
IAM user cleanup test 결과 
관련한 데모 삭제 완료 Level 200: Remote Configuration, Installation, and Viewing of CloudWatch logs :: AWS Well-Architected Labs
Level 200: Remote Configuration, Installation, and Viewing of CloudWatch logs Authors Pavan Baloo, Solutions Architect Intern, Well-Architected Introduction Most applications require monitoring services that make up the workload to understand the workload
wellarchitectedlabs.com
security-lab-stack.yaml0.01MB
템플릿 지정 
파라미터 설정 
보안그룹, 인스턴스, 클라우드 워치 설정된 것을 확인할 수 있다 
시작할 시 할당 키페어가 없는 상태 
포트 80번만 열린 상태 
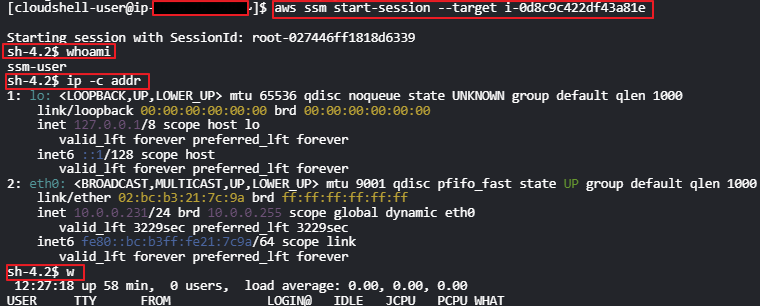
이러한 방식으로 시스템 매니저에서 연결이 가능하다 
시스템 매니저으로 바로 연결하기 위해서 접근 
인바운드 포트를 열지 않고 인스턴스에 연결이 가능하다 
웹에서 바로 접근할 수 있는 시스템 매니저 창이 나온다 
시스템 매니저(네트워크 및 포트 상태) 인바운드는 막혀있지만, 인스턴스 아웃바운드를 통해서 먼저 인스턴스가 시스템 매니저한테 요청한다
# aws ssm start-session --target <각자 자신의 인스턴스 ID>
[cloudshell-user@ip-10-4-56-85 ~]$ **aws ssm start-session --target i-0f7c75cd39b6fe44a**

Starting session with SessionId: admin-096a7df573bf3f166
sh-4.2$ **whoami**
sh-4.2$ **sudo systemctl stop sshd**
sh-4.2$ **sudo systemctl start sshd**
sh-4.2$ **exit**
(옵션) CloudShell 에서 CLI 에서 접속, 자신의 PC에서 사용 시 SessionManagerPlugin 설치 필요
cloudshell에서 조금 더 빠른 속도를 보여준다 INSTALL THE CLOUDWATCH AGENT - 링크
- CW Agent는 EC2 인스턴스의 활동을 모니터링하여 로그와 지표를 수집
- 목표 : AWS Systems Manager Run Command를 사용하여 원격에서 CW Agent를 설치 → 다수의 EC2 운영 관리에 유용
- System Manager → Run Command 메뉴 이동 - 링크 ⇒ 명령 실행 Run command 클릭
- 문서 이름 접두사 (같음) 선택 후 ‘AWS-ConfigureAWSPackage’ 입력 후 나오는 명령 선택 : 원격에서 EC2에 패키지 설치
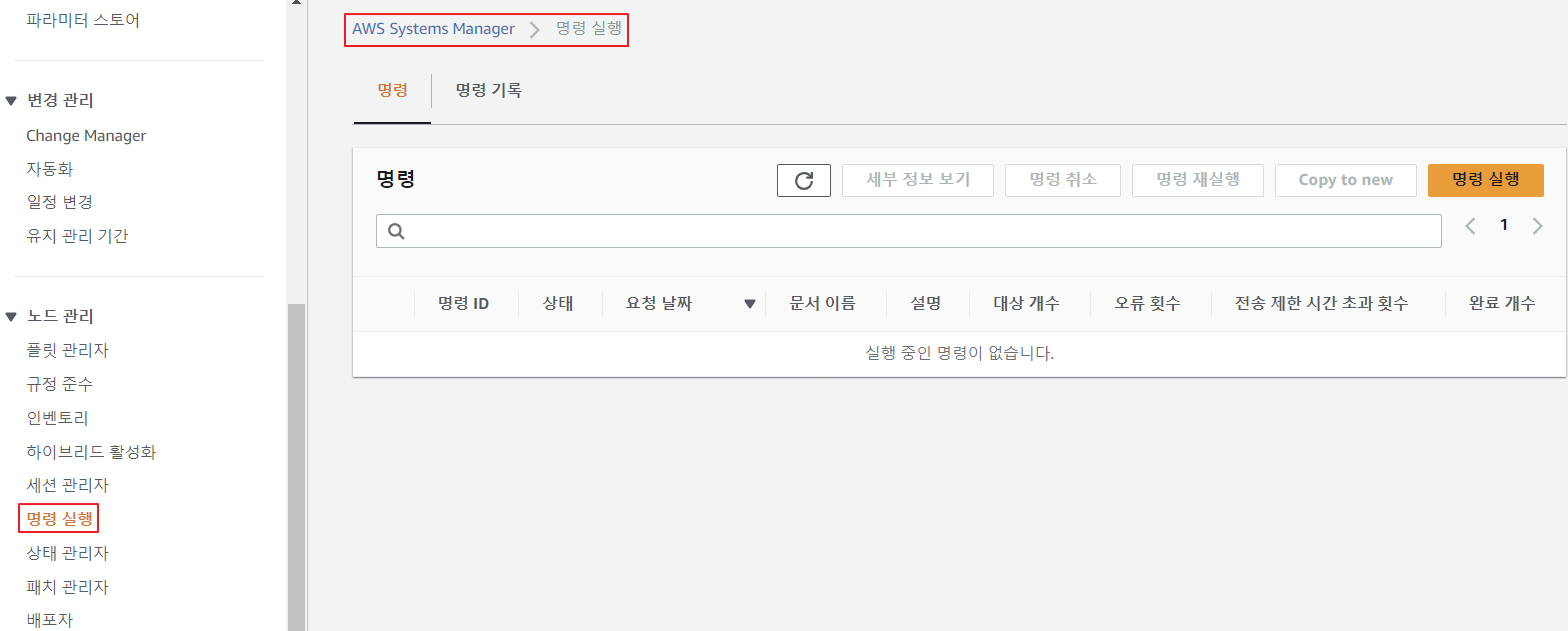
System Manager > 명령 실행 
AWS-ConfigureAWSPackage 
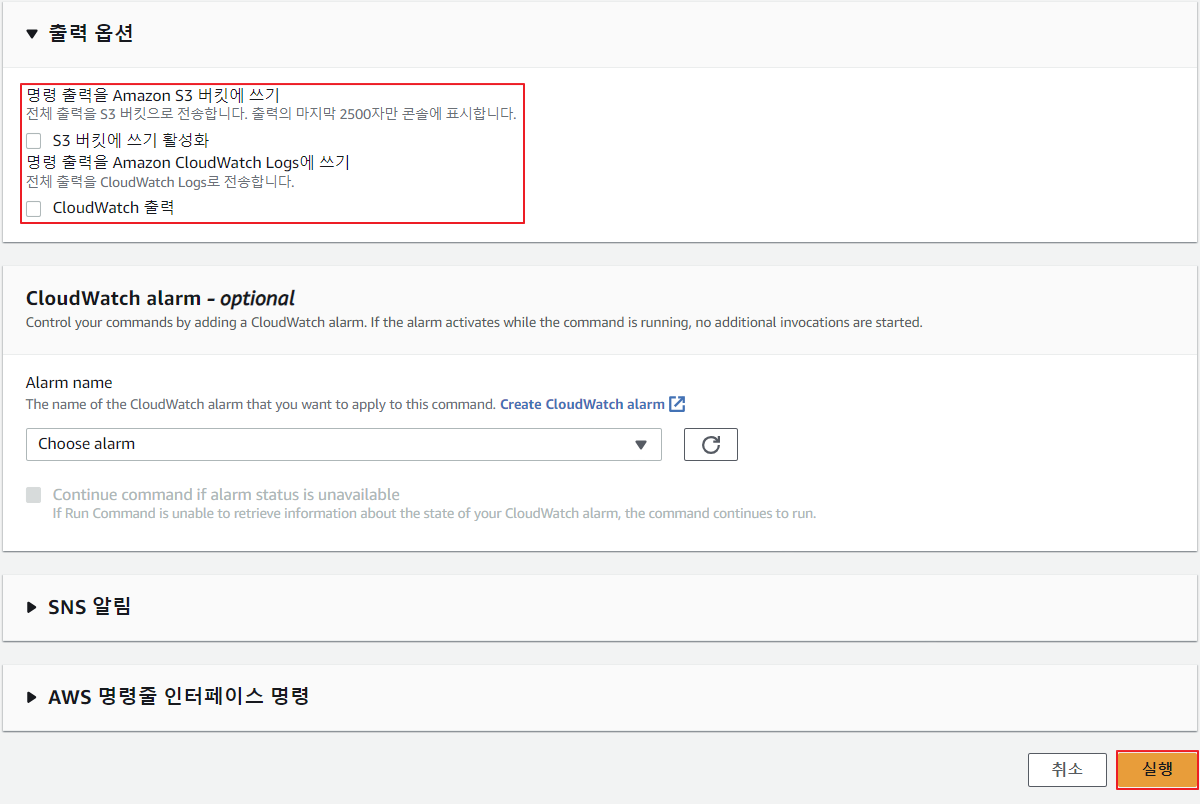
Command 파라미터 설정 - 대상 : 수동으로 인스턴스 선택(배포된 EC2) → S3 버킷에 쓰기 활성화(Uncheck) ⇒ 맨 하단 실행
- 대상 및 출력에서 인스턴스 선택(배포된 EC2) 후 ‘출력 보기’ 선택 → 성공 확인

수동으로 인스턴스 선택 
빨간박스 빈칸으로 만들고 실행하면 된다 (참고) aws ssm cmd
aws ssm send-command --document-name "AWS-ConfigureAWSPackage" --document-version "1" --targets '[{"Key":"InstanceIds","Values":["i-0f7c75cd39b6fe44a"]}]' --parameters '{"action":["Install"],"installationType":["Uninstall and reinstall"],"version":["latest"],"additionalArguments":["{}"],"name":["AmazonCloudWatchAgent"]}' --timeout-seconds 600 --max-concurrency "50" --max-errors "0" --region ap-northeast-2
명령 실행이 성공했다고 나옴 
빨간색 박스에 자세한 내용이 나와있다. 
조금 더 자세하게 설명이 나와 있다 STORE THE CLOUDWATCH CONFIG FILE IN PARAMETER STORE - 링크
- Parameter Store를 사용하면 재사용을 위해 구성 데이터와 암호를 안전하게 저장 및 재사용 가능
- 목표 : Systems Manager의 도구인 Parameter Store를 사용하여 CloudWatch 에이전트 구성을 저장
- CloudWatch 에이전트 구성 데이터는 CloudWatch로 전송될 로그 및 지표와 이 데이터의 소스를 지정
- System Manager → Parameter Store 메뉴 이동 - 링크 → 파라미터 생성 클릭 ⇒ 아래 입력 후 하단 파라미터 생성 클릭

- Name(이름) : AmazonCloudWatch-securitylab-cw-config
- AmazonCloudWatch`` 로 되어 있어야만, CW에서 유효한 구성 파일로 인식
- 계층(표준), 유형(문자열), 데이터 형식(text)
- 값 : config.json 파일 내용 : 이 구성 파일은 수집할 측정항목과 로그를 지정합니다.
- https://wellarchitectedlabs.com/Security/200_Remote_Configuration_Installation_and_Viewing_CloudWatch_Logs/code/config.json
{ "agent": { "metrics_collection_interval": 60, "run_as_user": "root" }, "logs": { "logs_collected": { "files": { "collect_list": [ { "file_path": "/opt/aws/amazon-cloudwatch-agent/logs/amazon-cloudwatch-agent.log", "log_group_name": "securitylablogs", "log_stream_name": "cw-agent-logs" }, { "file_path": "**/var/log/httpd/access_log**", "log_group_name": "securitylablogs", "log_stream_name": "apache-access-logs" }, { "file_path": "**/var/log/httpd/error_log**", "log_group_name": "securitylablogs", "log_stream_name": "apache-error-logs" }, { "file_path": "/var/log/boot.log", "log_group_name": "securitylablogs", "log_stream_name": "instance-boot-logs" }, { "file_path": "/var/log/secure", "log_group_name": "securitylablogs", "log_stream_name": "ssh-logs" }, { "file_path": "/var/log/yum.log", "log_group_name": "securitylablogs", "log_stream_name": "yum-logs" } ] } } }, "metrics": { "namespace" : "SecurityCWLab-Metrics", "append_dimensions": { "AutoScalingGroupName": "${aws:AutoScalingGroupName}", "ImageId": "${aws:ImageId}", "InstanceId": "${aws:InstanceId}", "InstanceType": "${aws:InstanceType}" }, "metrics_collected": { "disk": { "measurement": [ "used_percent" ], "metrics_collection_interval": 60, "resources": [ "*" ] }, "mem": { "measurement": [ "mem_used_percent" ], "metrics_collection_interval": 60 } } } }- 이 agent 섹션에서는 로그 에이전트를 실행할 사용자와 로그 수집 빈도를 지정합니다.
- 이 logs 섹션에서는 모니터링할 로그 파일과 해당 로그를 저장할 로그 그룹 및 스트림을 지정합니다. 이 정보는 다음에서 확인할 수 있습니다. collect_list
- 이 실습에서는 SSH 로그, Apache 웹 서버 로그 및 CloudWatch 에이전트 자체에 대한 로그를 수집합니다. 이후 단계에서 이러한 로그를 더 자세히 검토하겠습니다.
- 그만큼metrics섹션에서는 수집되는 측정항목을 지정합니다(metrics_collected), 수집 빈도, 측정 및 기타 세부 사항.
- 구성 파일 생성에 대한 자세한 내용은 다음을 참조하세요.이 링크
- 파라미터 스토어에 추가된 파라미터 확인
START THE CLOUDWATCH AGENT - 링크
- 목표 : 로그 수집을 시작하기 위해, 구성 파일을 로드하고 CloudWatch 에이전트를 다시 시작하자 ← Run Command
- System Manager → Run Command 메뉴 이동 - 링크 ⇒ 명령 실행 Run command 클릭
- 문서 이름 접두사 (같음) 선택 후 ‘AmazonCloudWatch-ManageAgent’ 입력 후 나오는 명령 선택 : 원격에서 EC2에 CW Agent에 명령 보냄

AmazonCloudWatch-ManageAgent 
AmazonCloudWatch-securitylab-cw-config 
해당 EC2에서 확인
sh-4.2$ **sudo systemctl status amazon-cloudwatch-agent**
● amazon-cloudwatch-agent.service - Amazon CloudWatch Agent
   Loaded: loaded (/etc/systemd/system/amazon-cloudwatch-agent.service; enabled; vendor preset: disabled)
   **Active: active** (running) since Sat 2023-09-16 15:16:42 UTC; 1min 47s ago
 Main PID: 4060 (amazon-cloudwat)
   CGroup: /system.slice/amazon-cloudwatch-agent.service
           └─4060 /opt/aws/amazon-cloudwatch-agent/bin/amazon-cloudwatch-agent **-config /opt/aws/amazon-cloudwatch-agent/etc/amazon-cloudwatch-agent.toml** -envconfig /opt/aws/amazon-cloudwatch-agent/etc/env-config.json -otelconfig /opt/aws/amazon-clo...

Sep 16 15:16:42 ip-10-0-0-237.ap-northeast-2.compute.internal systemd[1]: Started Amazon CloudWatch Agent.
Sep 16 15:16:42 ip-10-0-0-237.ap-northeast-2.compute.internal start-amazon-cloudwatch-agent[4060]: /opt/aws/amazon-cloudwatch-agent/etc/amazon-cloudwatch-agent.json does not exist or cannot read. Skipping it.
Sep 16 15:16:42 ip-10-0-0-237.ap-northeast-2.compute.internal start-amazon-cloudwatch-agent[4060]: I! Detecting run_as_user...

sh-4.2$ **cat /opt/aws/amazon-cloudwatch-agent/etc/amazon-cloudwatch-agent.toml**
Run Command 성공 
한번 -config 파일을 cat 명령어로 보자 
이러한 식으로 config 관련된 부분이 많이 보이는 것을 볼 수 있다 GENERATE LOGS - 링크
- 자신의 웹 사이트에 방문하여 웹 액세스 로그 생성 : 자신의 PC, CloudShell
- 반복 접속 및 /example 등 없는 URL도 접속 시도 해보기
while true; do curl -s <EC2 IP> ; sleep 5; date; done
CW에 어떠한 변화가 있는지 확인해보자 VIEW YOUR CLOUDWATCH LOGS - 링크
- CW → 로그 그룹 : securitylablogs 클릭 - 링크 → 로그 스트림 이름 확인 ⇒ apache-access-logs 확인

로그 그룹 
테일링 시작 
필터 적용할 수 있게 조건 설정 while true; do curl -s 13.125.129.118/1.html ; sleep 1; date; doneCW Live Tail : 로그 그룹 선택 → 로그 스트림(apache-acess-logs) 선택
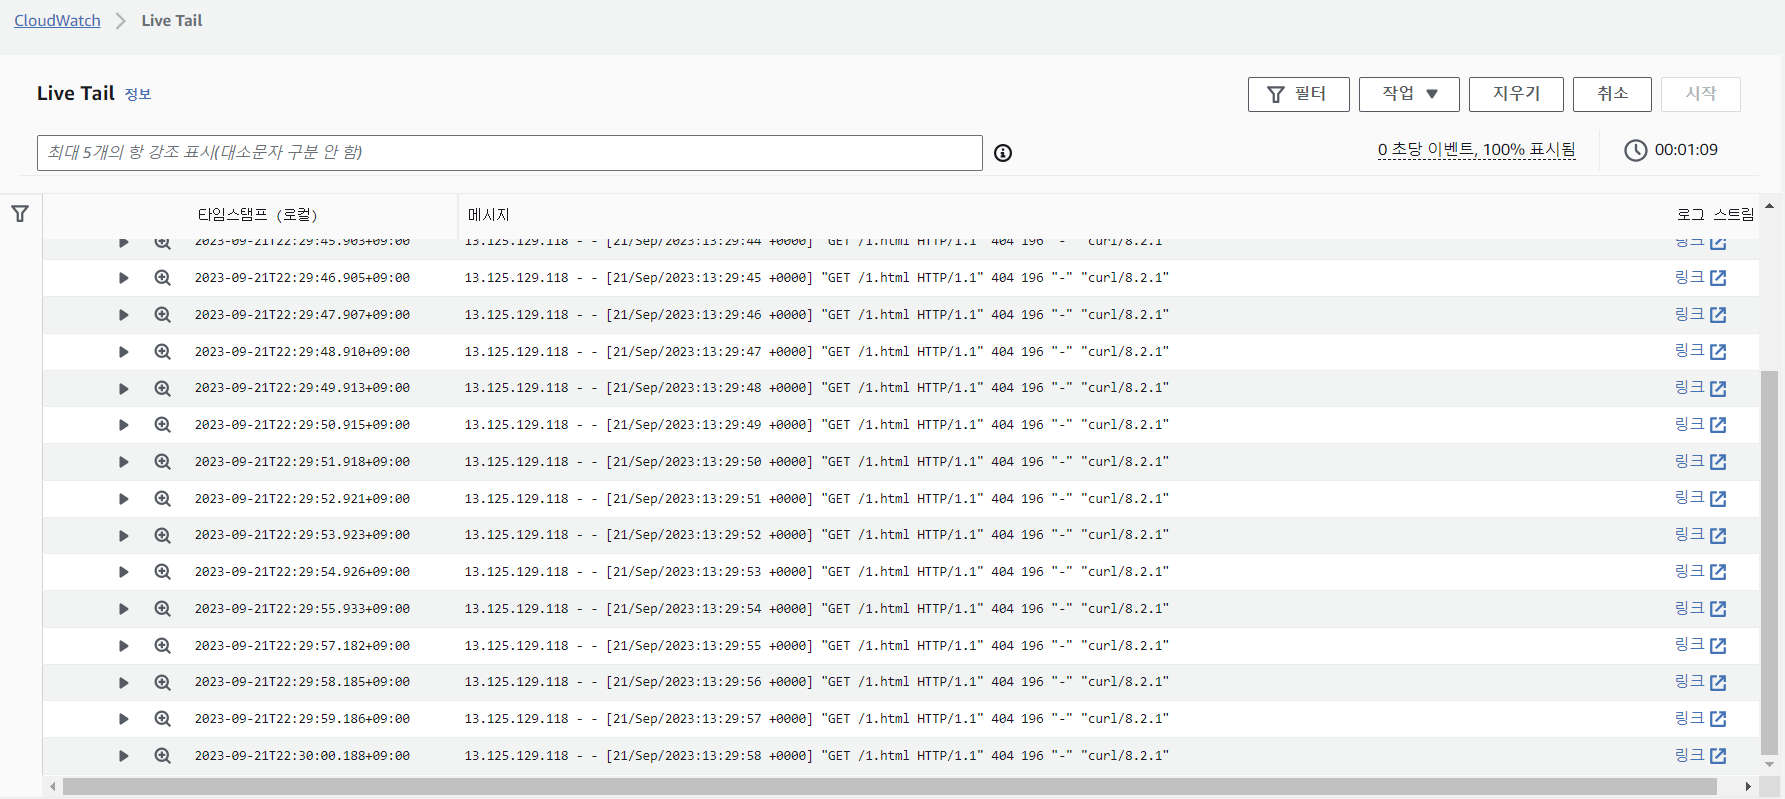
Live Tail - CW Live Tail 확인
- 자신의 PC 또는 CloudShell에서 EC2 웹 반복 접속 실행
MYIP=3.34.53.208
while true; do curl -s $MYIP ;echo; sleep 1; done
EXPORT LOGS TO S3 - 링크
- 목표 : 로그를 수집한 후 CloudWatch에서 S3 버킷으로 로그를 내보낼 수 있습니다.
- S3에 데이터를 저장하는 것이 CloudWatch에 저장하는 것보다 비용 효율적이고 안정적 ← 장기 저장 및 보관에 적합함
- CW 로그 그룹 : securitylablogs → Export data to Amazon S3 클릭

securitylablogs → Export data to Amazon S3 
내보내기 설정 QUERY LOGS FROM S3 USING ATHENA - 링크
- 이제 로그 데이터가 S3에 저장되면 서버리스 대화형 쿼리 서비스인 Amazon Athena를 활용하게 됩니다. 로그 파일에 대해 SQL 쿼리를 실행하여 로그 파일에서 정보를 추출합니다. 이 섹션에서는 Apache 액세스 로그에 중점을 두지만 Athena를 사용하여 모든 로그 파일을 쿼리할 수 있습니다.
- CloudWatch Insights에서 로그 데이터를 쿼리할 수 있지만 Athena 쿼리를 사용하면 S3에 저장된 파일뿐만 아니라 Insights가 CloudWatch의 데이터 쿼리만 허용하는 다른 소스에서도 데이터를 가져올 수 있습니다. Athena는 업계 표준 언어인 SQL 쿼리를 지원합니다.
- Athena → (쿼리 결과 위치 설정) 설정 편집 : s3://REPLACE_ME_BUCKETNAME/athenaqueries/

설정 편집 
s3:// REPLACE_ME_BUCKETNAME /athenaqueries/ - 편집기
- 먼저 데이터베이스 생성 → 생성 후 오른쪽에 생성된 데이터베이스 선택
CREATE database security_lab_logs
security_lab_logs 
DB 선택 가능 + 클릭 후 퀴리2에서 아래 쿼리 실행 : 테이블 생성
CREATE EXTERNAL TABLE IF NOT EXISTS `security_lab_apache_access_logs` (
  request_date string,
  request_timestamp string,
  request_ip string,
  request_method string,
  request string,
  response_code int,
  response_size int,
  user_client_data string,
  garbage string
  )
ROW FORMAT SERDE 'org.apache.hadoop.hive.serde2.RegexSerDe'
WITH SERDEPROPERTIES (
 "input.regex" = "([^ ]*)T([^ ]*)Z ([^ ]*) (?:[^ ]* [^ ]*) (?:[^\\"]*) \\"([^ ]*) ([^\\"]*)\\" ([^ ]*) ([^ ]*) (?:\\"[^\\"]*\\") (\\"[^\\"]*\\")([^\\n]*)"
 )
LOCATION 's3://***REPLACE_ME_BUCKET***/lablogs/***REPLACE_ME_STRING***/apache-access-logs/'
TBLPROPERTIES (
  'compressionType' = 'gzip'
  );
+ 클릭 후 퀴리2에서 'AHSS[1기]' 카테고리의 다른 글
AWS에서의 침해사고 자동 대응: 실시간 SSRF 감지 및 대응 자동화 (0) 2023.09.11 5주차(9.24) : AWS Penetration Testing (0) 2023.08.25 3주차(9.10) - 웹 취약점 및 보안 (0) 2023.08.25 2주차(9.3) : IAM 취약점 및 보안 (0) 2023.08.25 1주차(8.27): S3 취약점 및 보안 (0) 2023.08.25 다음글이전글이전 글이 없습니다.댓글